The Chronicler’s Company was a group of Matoran from all of Mata Nui’s villages gathered by Takua to assist the Toa Mata in their quest. In BYE, they form a sub-archetype of Matoran with the unique property of directly supporting each other across the Attribute boundaries between villages.
Their founder, leader, and curiously not member of the archetype by name is the Chronicler himself, Takua.
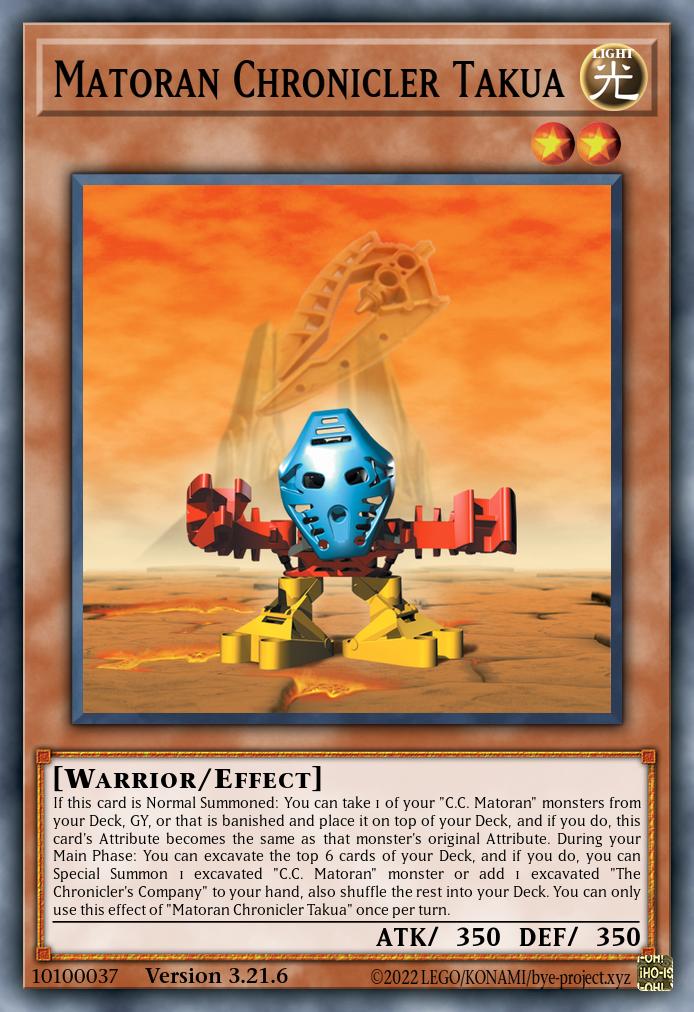
Matoran Chronicler Takua
Effect MonsterLevel 2 | LIGHT Warrior | ATK 350 / DEF 350If this card is Normal Summoned: You can take 1 of your “C.C. Matoran” monsters from your Deck, GY, or that is banished and place it on top of your Deck, and if you do, this card’s Attribute becomes the same as that monster’s original Attribute. During your Main Phase: You can excavate the top 6 cards of your Deck, and if you do, you can Special Summon 1 excavated “C.C. Matoran” monster or add 1 excavated “The Chronicler’s Company” to your hand, also shuffle the rest into your Deck. You can only use this effect of “Matoran Chronicler Takua” once per turn.
As in the story, his role is to travel across the six villages, in the process meeting his allies that would later become part of the Company. This is reflected in an excavation effect that digs exactly six cards deep to find and Special Summon a C.C. Matoran, potentially also picking up the card that represents the Chronicler’s Company as a whole while he’s at it. To make sure you don’t discard and excavate only to find nothing, he can set up a C.C. Matoran to find when he’s Summoned, while at the same time changing his own Attribute as a color-changing Av-Matoran. This means using him in a Koro deck to quickly access the sole resident C.C. Matoran, and from there the Turaga, is also a legitimate option.
Now, to understand what the archetype is actually meant to do, let’s look at the aforementioned card that shows them collectively.
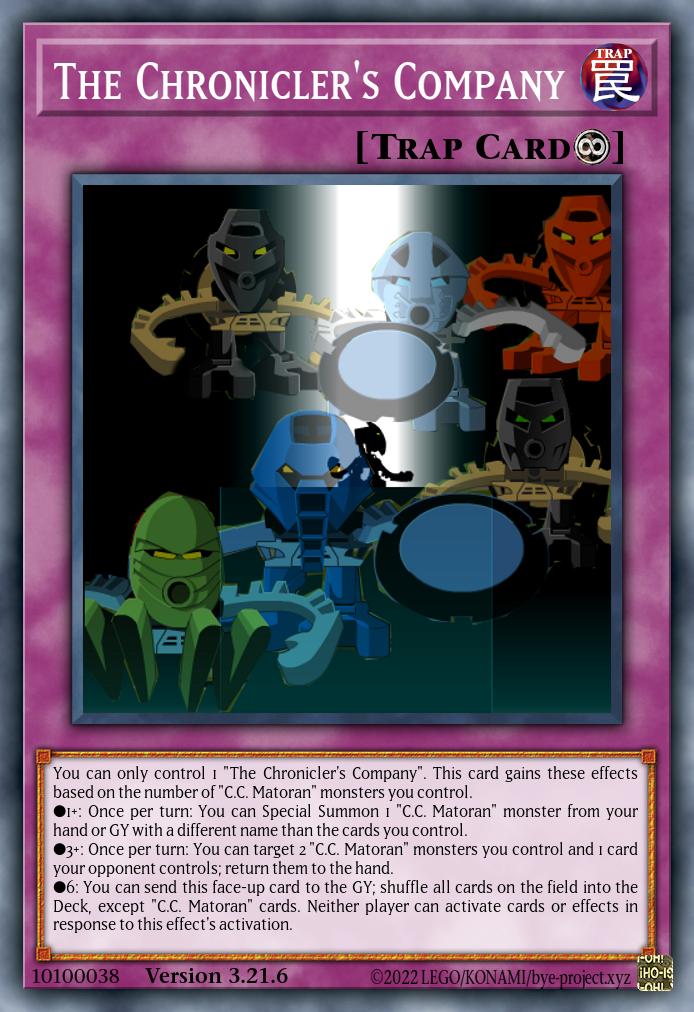
The Chronicler’s Company
Continuous TrapYou can only control 1 “The Chronicler’s Company”. This card gains these effects based on the number of “C.C. Matoran” monsters you control.
●1+: Once per turn: You can Special Summon 1 “C.C. Matoran” monster from your hand or GY with a different name than the cards you control.
●3+: Once per turn: You can target 2 “C.C. Matoran” monsters you control and 1 card your opponent controls; return them to the hand.
●6: You can send this face-up card to the GY; shuffle all cards on the field into the Deck, except “C.C. Matoran” cards. Neither player can activate cards or effects in response to this effect’s activation.
Clearly a significant element is swarming the field with C.C. Matoran monsters, since this Trap Card gains better and better effects as you assemble more of them. If you have at least one, you get to bring out a fresh name from your hand or GY, getting you closer to the next tier, setting up combos, and interacting with the overall gimmick in a neat way that will soon become clear. At least three, and you get to bounce 2 members of the Company and any (targetable) card your opponent controls – anything written on a Trap Card is a Quick Effect by default, so this is disruption, hence the uneven trade (also, these Matoran are small, one of them alone won’t get anything off the field). And if you’re enough of a madman to fill every single Monster Zone, Main or Extra, with C.C. Matoran, you can just unrespondably wipe the field of everything else. The insane strength of this last effect reflects how little I expect it to happen.
So if we want to fill everything including the Extra Monster Zone, that means there must be some archetypal Extra Deck Monsters, right? Not quite, the trick instead lies in the next key card to consider.
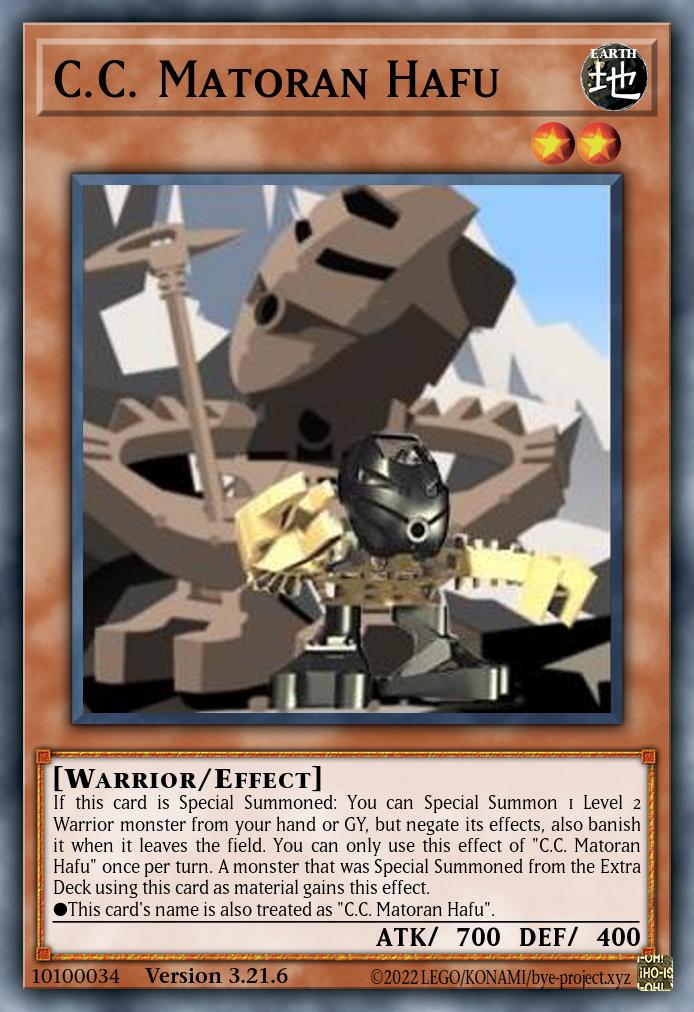
C.C. Matoran Hafu
Effect MonsterLevel 2 | EARTH Warrior | ATK 700 / DEF 400If this card is Special Summoned: You can Special Summon 1 Level 2 Warrior monster from your hand or GY, but negate its effects, also banish it when it leaves the field. You can only use this effect of “C.C. Matoran Hafu” once per turn. A monster that was Special Summoned from the Extra Deck using this card as material gains this effect.
●This card’s name is also treated as “C.C. Matoran Hafu”.
In addition to getting another Level 2 Warrior (so any C.C. Matoran, but also Tuners like Junk Anchor for Synchro plays) when Special Summoned, making him usually the best thing to get with Takua, any Extra Deck monster that used Hafu as material will become a “Hafu Original” that bears his very name, C.C. Matoran archetype and all. This is how you make them count for The Chronicler’s Company, and it also renders your boss monsters receptive to our actual gimmick: The fact that most of the same monsters you use to combo also significantly power up other members of the archetype on the field.
C.C. Matoran Kapura
Effect MonsterLevel 2 | FIRE Warrior | ATK 600 / DEF 200If a “C.C. Matoran” monster you control attacks, your opponent cannot activate cards or effects until the end of the Damage Step. At the start of your Battle Phase: You can banish this card from your GY, then target 1 face-up monster you control that was not Summoned this turn; it can make up to 2 attacks on monsters during this Battle Phase. You can only use this effect of “C.C. Matoran Kapura” once per turn.
C.C. Matoran Kopeke
Effect MonsterLevel 2 | WATER Warrior | ATK 300 / DEF 600If this card is Normal Summoned or flipped face-up: You can add 1 Level 2 Warrior monster from your Deck or GY to your hand, except “C.C. Matoran Kopeke”, then, if you added a non-WATER monster by this effect, place 1 card from your hand on top of the Deck. You can only use this effect of “C.C. Matoran Kopeke” once per turn. If another “C.C. Matoran” monster(s) you control would be destroyed, you can change this card to face-down Defense Position instead.
C.C. Matoran Tamaru
Effect MonsterLevel 2 | WIND Warrior | ATK 400 / DEF 400If you control a Warrior monster with 1000 or less ATK: You can discard 1 card; Special Summon this card from your hand or GY, but place it on the bottom of the Deck when it leaves the field. During your Main Phase: You can activate this effect; your “C.C. Matoran” monsters can attack directly this turn, also return this card to the hand. You can only use each effect of “C.C. Matoran Tamaru” once per turn.
The clearest examples of this are Kapura, Kopeke, and Tamaru, who respectively provide unstoppable attacks, destruction protection, and the ability to attack directly. Not exactly impressive when they only affect these absolutely tiny shrimps, but things suddenly look very different when you, for example, make a generic 3000 ATK boss monster with Hafu, bring back Kapura with the Continuous Trap, get Tamaru to the field with his own effect, and throw those 3000 into a direct attack with no responses allowed during the Damage Step.
Slightly different are the boosts provided by Maku and Taipu:
C.C. Matoran Maku
Effect MonsterLevel 2 | WATER Warrior | ATK 500 / DEF 200When your opponent activates a card or effect on the field (Quick Effect): You can Special Summon this card from your hand or GY to your zone in that card’s column, and if you do, change 1 face-up monster on the field to Defense Position. (Quick Effect): You can target 1 other face-up card you control; for the rest of this Chain, or until the end of this turn if it is a “Matoran” monster, it is unaffected by card effects, except its own. You can only use each effect of “C.C. Matoran Maku” once per turn.
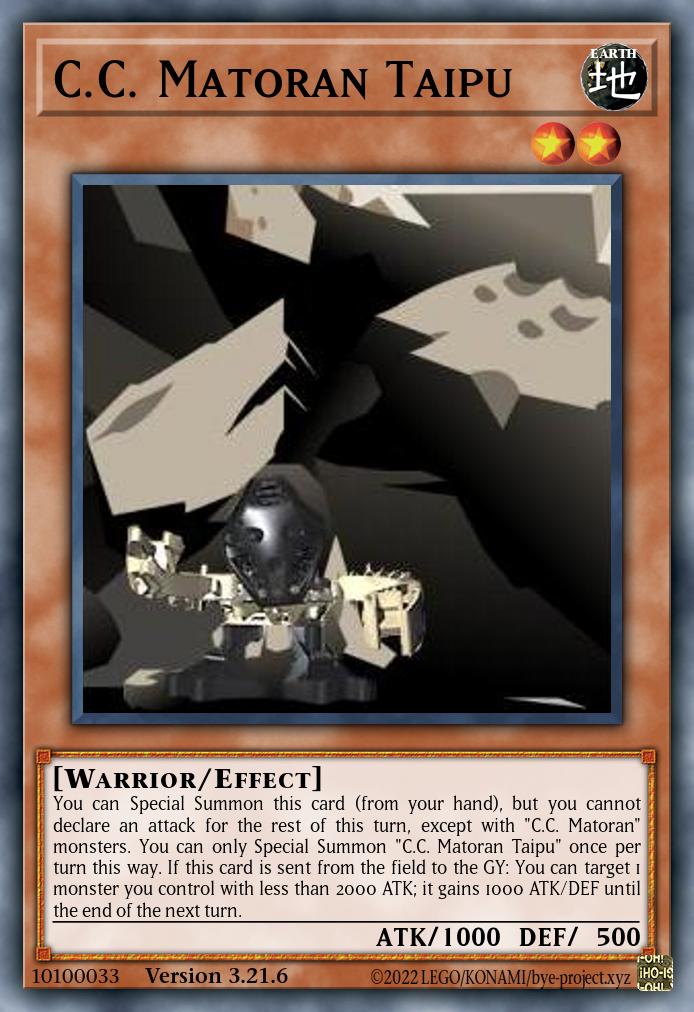
C.C. Matoran Taipu
Effect MonsterLevel 2 | EARTH Warrior | ATK 1000 / DEF 500You can Special Summon this card (from your hand), but you cannot declare an attack for the rest of this turn, except with “C.C. Matoran” monsters. You can only Special Summon “C.C. Matoran Taipu” once per turn this way. If this card is sent from the field to the GY: You can target 1 monster you control with less than 2000 ATK; it gains 1000 ATK/DEF until the end of the next turn.
The former can give protection to any face-up card, but it will only last for a single Chain (so basically the one effect you’re responding to) unless that card is a Matoran – not specifically a C.C. Matoran, gotta have that Huki synergy. In Taipu’s case, he doesn’t directly provide a benefit, but instead allows C.C. Matoran to ignore the attack restriction that forms the drawback of his free Special Summon from hand.
Sample Deck
The core of the deck is formed, obviously, by the C.C. Matoran and Takua, with the number of each reflecting how much having them in hand helps getting combo fodder – if we just manage that, everything else can be searched one way or another. The basic line of play first makes Isolde and uses her to get either Takua or Hafu, whose effects in turn provide you with the multiple monsters you need to keep going. Neo Space Connector and Aqua Dolphin are just another way to accomplish that.
In most cases, the payoff from Isolde will be no less than three Level 2 Warriors, which opens up different options depending on what they are. If all of them are Matoran, you can go for the Diminished Matoran Kaita, which can variably be a beater, a wall, and/or an extender. If you have a Tuner in there – such as Junk Anchor or T.G. Striker – you can instead go through a combo that moves through Stupid Bitch Cupid Pitch and ends on a Level 8 Synchro like Borreload Savage Dragon or PSY-Framelord Omega (Road Warrior is also funny for basically Summoning anything from the archetype for free) while searching a Hop Ear Squadron that can be used on your opponent’s turn to upgrade to Satellite Warrior and destroy a bunch of cards. Whichever boss you end on, Hafu will probably be involved, thus letting you utilize The Chronicler’s Company to get some monsters back, maybe have some extra disruption, and maybe maybe finish things with a legendary blowout.
And it’s also nice that all this still leaves a bit of room for handtraps and generic staples in the Main Deck – certainly not something that can be said for every archetype I’ve come up with here.
Best of Test

Conclusion
The Chronicler’s Company are an archetype with the dual focus of comboing into generic boss monsters and powering up those same monsters by treating them as part of the archetype so they benefit from the support effects the monsters provide. The ability to search out and Special Summon monsters in various ways usually makes getting the necessary pieces to accomplish all this to the field a fairly simple task, and the Continuous Trap acts as a kind of archetypal boss that can help with setup, disruption, and straight up winning the game depending on how well you are doing.